If you manage a website, you’ve likely heard of privacy laws like GDPR, CCPA, and ePrivacy. These laws require websites to inform users about cookies and obtain consent before collecting any personal data. But how can you manage that easily and automatically?
Enter Cookiebot—a leading cookie consent management platform designed to help websites stay compliant with data privacy laws while offering users transparency and control.
In this guide, we’ll explain what Cookiebot is, why it’s essential, and provide a step-by-step walkthrough on how to set it up on your website, whether you’re using WordPress, Shopify, or custom code.
What Is Cookiebot?
Cookiebot is a cloud-driven solution that automatically scans your website for cookies and displays a customizable consent banner to users. Its primary goal is to help you comply with privacy regulations like:
- General Data Protection Regulation (GDPR) – Europe
- California Consumer Privacy Act (CCPA) – USA
- Brazilian LGPD and others
Key Features:
- Automatic Cookie Scanning: Finds and categorizes cookies on your site regularly.
- Customizable Consent Banners: Design banners that match your branding and preferences.
- Multi-language Support: Supports 40+ languages for global users.
- Consent Logging: Keeps a log of user consents for audit purposes.
- Seamless Integration: Works with most CMS platforms and Google Consent Mode.
Whether you’re a blog owner, an eCommerce manager, or a marketing agency, Cookiebot simplifies the process of maintaining compliance without needing to code everything from scratch.
Why You Need Cookiebot on Your Website
1. Legal Compliance
With strict privacy regulations in place, failing to get user consent before dropping cookies could lead to fines and legal action. Cookiebot ensures that your website respects users’ rights from their first visit.
2. Build Trust
By showing visitors that you care about their privacy, you strengthen your brand reputation and credibility. Transparent consent mechanisms increase user confidence, especially in industries handling sensitive data.
3. Automate Cookie Management
Cookiebot removes the manual work. It scans your site automatically, classifies cookies, and updates your cookie declaration—saving time and reducing human error.
4. Compatible with Google Ads & Analytics
Using Google Consent Mode, Cookiebot allows you to run ads and measure performance without violating consent rules. It can adjust how Google tools behave based on user choices.
Step-by-Step Guide to Set Up Cookiebot
Setting up Cookiebot is easier than you might think. Follow these simple steps:
Step 1: Create a Cookiebot Account
- Visit www.cookiebot.com.
- Click on “Sign Up.”
- Choose a plan:
- Free: For websites with fewer than 100 pages.
- Premium: Starts with a monthly fee based on the number of subpages.
After signing up, you’ll be directed to the admin dashboard.
Step 2: Configure Your Domain

Once on your dashboard:
- Enter your website domain.
- Choose whether you want prior consent (most common for GDPR).
- Set preferences for banner type, colors, and positioning.
- Choose the languages your site supports.
Cookiebot will now begin scanning your site for cookies. This might take a few hours, depending on the size of your site.
Step 3: Install the Cookiebot Script on Your Website
You’ll receive a JavaScript snippet that you need to place in your website’s <head> section.
For WordPress Users:
- Install the official Cookiebot plugin.
- Go to Settings > Cookiebot.
- Paste your Cookiebot ID (provided in your dashboard).
- Save changes, and you’re done.
For Shopify:
- Go to Online Store > Themes > Edit Code.
- Find
theme.liquid. - Paste the Cookiebot script right before
</head>. - Save the file.
For Custom HTML Sites:
- Open your HTML file.
- Paste the script in the
<head>tag. - Upload to your server.
For Google Tag Manager (GTM):
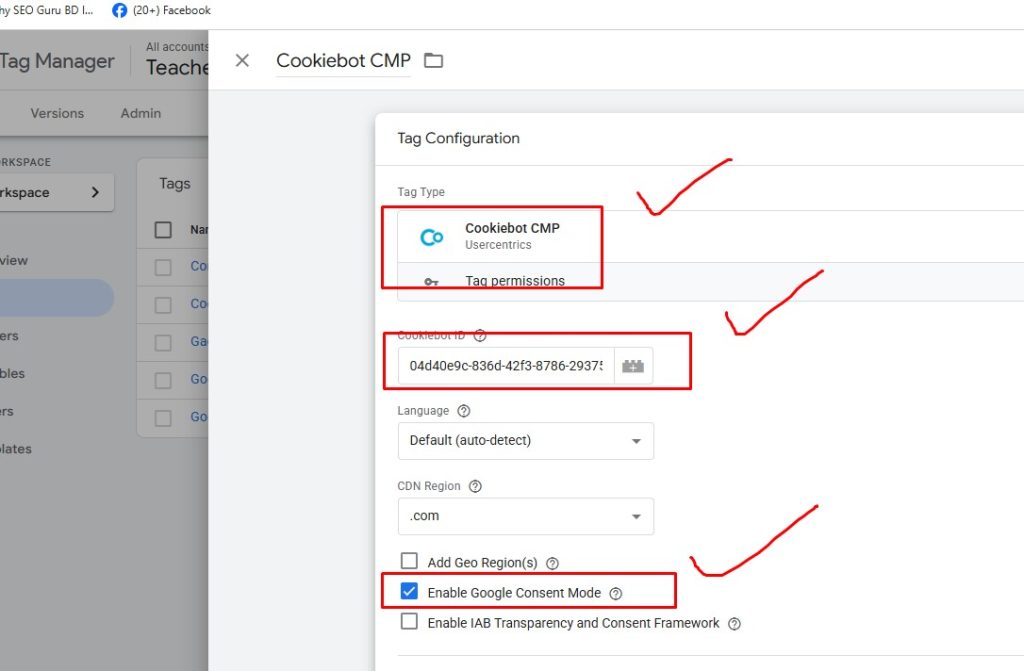
- Use the Cookiebot template from the template Gallery.
- Paste the Cookie ID
- Set the trigger to fire on All Pages.
- Make sure it fires before any other tracking tags.
Step 4: Run a Cookie Scan
After installation, go back to the Cookiebot dashboard:
- Click on “Cookies” to see the scan results.
- Cookies will be automatically categorized (Necessary, Preferences, Statistics, Marketing).
- Add descriptions or edit categories as needed.
You’ll also get a cookie declaration link, which you can add to your privacy policy page.
Step 5: Customize the Consent Banner
Make your cookie banner user-friendly and brand-aligned.
Options to customize:
- Banner Type: Pop-up, slide-down, or bottom bar.
- Colors: Match your website’s color scheme.
- Text: Customize consent wording for clarity and compliance.
- Branding: Add your logo or company name.
Pro tip: Keep the language clear and concise. Avoid dark patterns that force users into accepting cookies.
Step 6: Test and Verify
Before going live, make sure everything works correctly.
- Open your website in incognito mode or use a different browser.
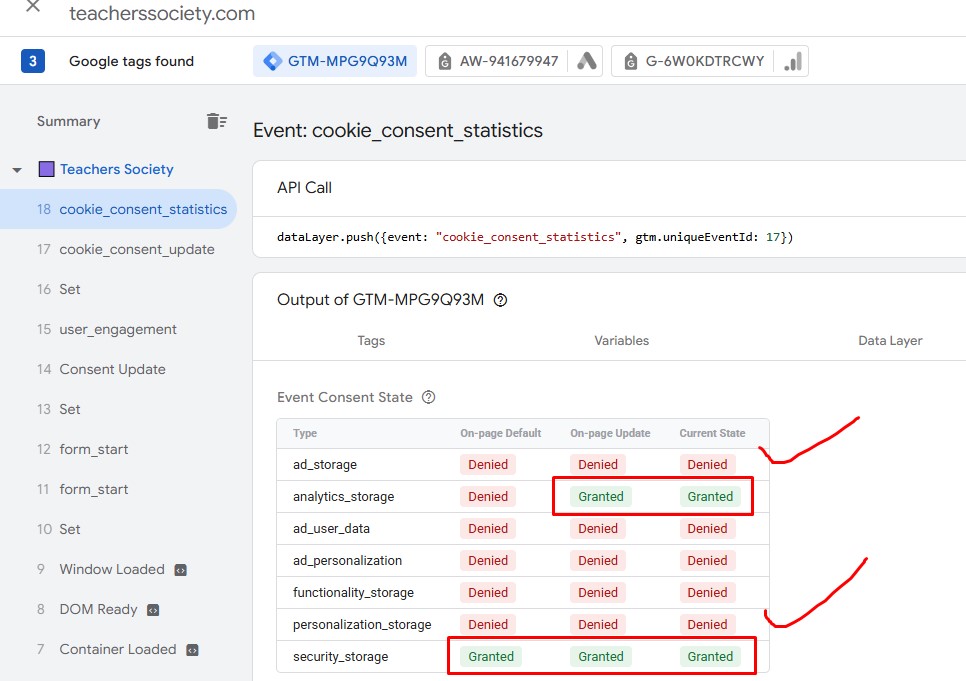
- Confirm that:
- The banner loads immediately.
- Cookies are blocked until the user consents.
- Your tracking scripts (e.g., Google Analytics) only run after consent.
You can also use Cookiebot’s compliance test tool to verify proper setup.
Best Practices for Cookiebot Implementation
To make the most out of Cookiebot, consider the following tips:
1. Keep Your Privacy Policy Updated
Ensure your cookie and privacy policies are in sync with Cookiebot’s declaration. Link to them from your banner for easy access.
2. Enable Auto-blocking
Use Cookiebot’s automatic script blocking to prevent cookies from loading until user consent is given. This is crucial for compliance.
3. Re-scan Your Site Monthly
Set up automatic scans to detect newly added cookies. This keeps your cookie declaration up to date.
4. Use Google Consent Mode (Optional)
If you’re running Google Ads or Analytics, enable Consent Mode to adjust how data is collected based on user choices—preserving ad performance without violating privacy laws.
5. Keep Records of User Consent
Cookiebot stores consent records for audit purposes, helping you prove compliance in case of an investigation.
Conclusion
Cookie compliance is no longer optional—it’s a necessity. With global privacy laws growing stricter, using a tool like Cookiebot is a smart move for any website owner.
Cookiebot not only simplifies cookie management, but it also helps build trust with your audience, maintain legal compliance, and keep your digital marketing running smoothly.
By following the steps in this guide, you can implement Cookiebot in just a few minutes and ensure your website respects user privacy from day one.
Some FAQs related to Cookiebot
1. Is Cookiebot free to use?
Yes! Cookiebot offers a free plan for websites with fewer than 100 subpages. For larger sites or advanced features, you can upgrade to a premium plan.
2. Does Cookiebot support multiple languages?
Yes. Cookiebot supports 40+ languages and will automatically detect the user’s browser language to display the correct banner.
3. Will Cookiebot slow down my website?
No. Cookiebot scripts are optimized for performance and load asynchronously, so they won’t impact your page speed.
4. Can I use Cookiebot with Google Tag Manager (GTM)?
Absolutely. You can deploy Cookiebot via GTM using a Custom HTML tag and manage consent for other tags with Google’s Consent Mode integration.