In today’s digital landscape, data privacy is more important than ever. If your website collects user data through cookies, you are required by laws like GDPR, CCPA, and other global privacy regulations to inform users and gain their consent. That’s where CookieYes comes in.
This guide will walk you through everything you need to know about CookieYes and how to use it to implement cookie consent on your website — from signup to installation, configuration, and compliance tips.
What is CookieYes?
CookieYes is a popular cookie consent management platform that helps website owners comply with data privacy laws. It enables you to create customizable cookie banners, manage user consent preferences, and automate cookie blocking based on user choices.
Read more: Cookiebot Setup Guide: How to Implement Cookie Consent on Your Website
Whether you run a simple blog, an eCommerce store, or a business website, CookieYes can be integrated with any platform, including WordPress, Shopify, Wix, and more. It’s known for its intuitive dashboard, auto cookie scanning feature, and real-time consent logs.
Key features:
- Auto cookie scanning and categorization
- Fully customizable consent banners
- Geo-targeting rules (e.g., show GDPR banner only in EU)
- Consent logging for proof of compliance
- Integration with popular CMS and website builders
Why You Need Cookie Consent on Your Website
Implementing cookie consent is not optional if your website collects personal data — it’s a legal requirement in many regions.
1. Legal Compliance
Laws like the General Data Protection Regulation (GDPR) in Europe and the California Consumer Privacy Act (CCPA) in the U.S. require websites to:
- Inform users about cookies used
- Get explicit consent before tracking
- Allow users to manage or withdraw consent
Failure to comply can result in hefty fines or legal issues.
2. Build Trust with Users
A visible and transparent cookie banner signals that you care about your visitors’ privacy. It enhances brand reputation and encourages trust.
3. Avoid Risk of Data Violations
Implementing a compliant cookie banner helps prevent unauthorized tracking and ensures third-party scripts (like Facebook Pixel, Google Analytics) don’t run before consent is granted.
Prerequisites Before Setting Up CookieYes
Before you dive into the setup, make sure you have the following:
- A live website (it must be online to scan for cookies).
- Admin access to your CMS, site builder, or codebase.
- A basic understanding of the types of cookies your website uses (e.g., analytics, marketing).
Step-by-Step CookieYes Setup Guide
Step 1: Sign Up and Create an Account
Visit https://www.cookieyes.com and create an account. You can choose between:
- Free Plan (includes basic features and 1 domain)
- Paid Plans (advanced customization, geo-targeting, consent logs)
After signing up, log in to the CookieYes dashboard.
Step 2: Add Your Website
From the dashboard:
- Click “Add Website”
- Enter your domain (e.g., yourdomain.com)
- Select your country/region for compliance targeting (e.g., EU for GDPR)
CookieYes will automatically assign a unique script code for your site.
Step 3: Scan Your Website for Cookies
Click “Scan Website” to detect all cookies used on your site.
Why this matters:
- It ensures your banner accurately informs users.
- CookieYes categorizes cookies (necessary, analytics, ads, etc.).
- You can manually review and edit cookie details.
Step 4: Customize Your Cookie Consent Banner
Navigate to “Customize Banner” in your dashboard.
Options you can customize:
- Layout: Popup, banner top, bottom, or box
- Text and Language: Change button labels, banner message, and set multiple languages
- Colors and Fonts: Match your brand identity
- Consent Type: Opt-in (default), opt-out, or information-only
CookieYes also allows brand logos and links to your privacy policy for added trust.
Step 5: Configure Consent Behavior and Preferences
Under Settings > Consent Behavior, set:
- Auto-blocking: Block third-party cookies until consent is given
- Re-consent interval: When should users be asked again?
- Region Targeting: Only show the banner to users in GDPR/CCPA regions
Make sure to enable:
- Consent Logs: Track and store user consent for auditing
Step 6: Install CookieYes on Your Website
Option 1: Manual Script Installation
- Copy the unique CookieYes script
- Paste it into the
<head>section of your HTML code - Done!
Option 2: CMS Integrations
- WordPress: Use the official CookieYes plugin. Install > Activate > Connect your account.
- Shopify: Paste the script in the theme.liquid file above the
</head>tag. - Wix/Squarespace: Add the code using built-in custom code sections.
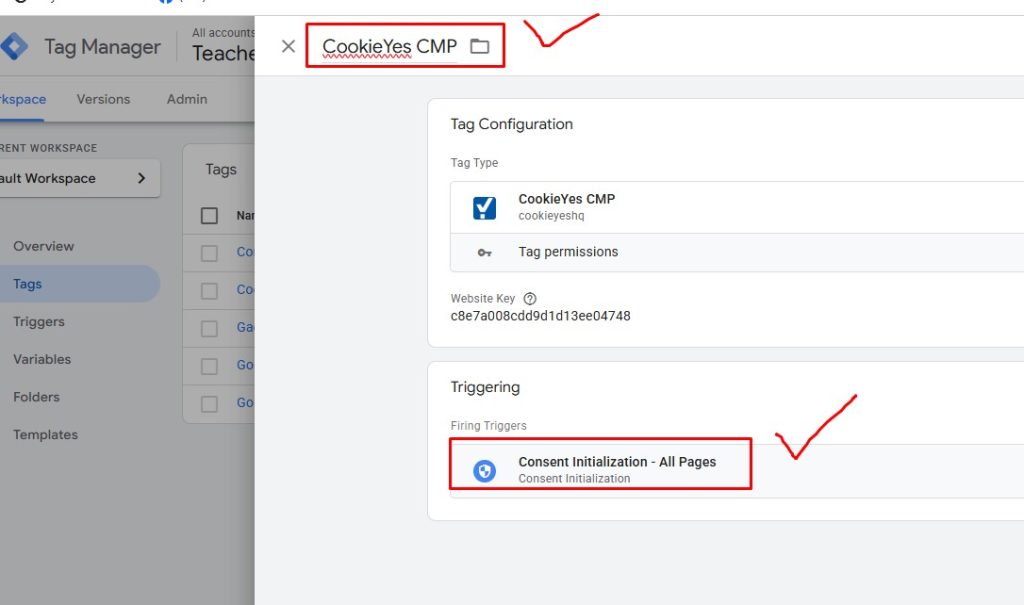
- Google Tag Manager (GTM):
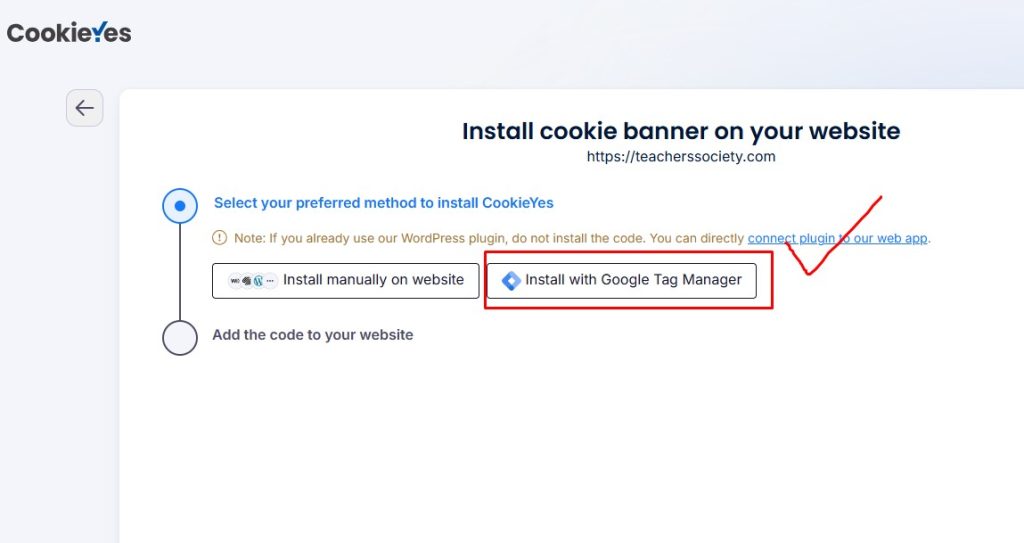
- Create a new Custom HTML Tag or Use a Template
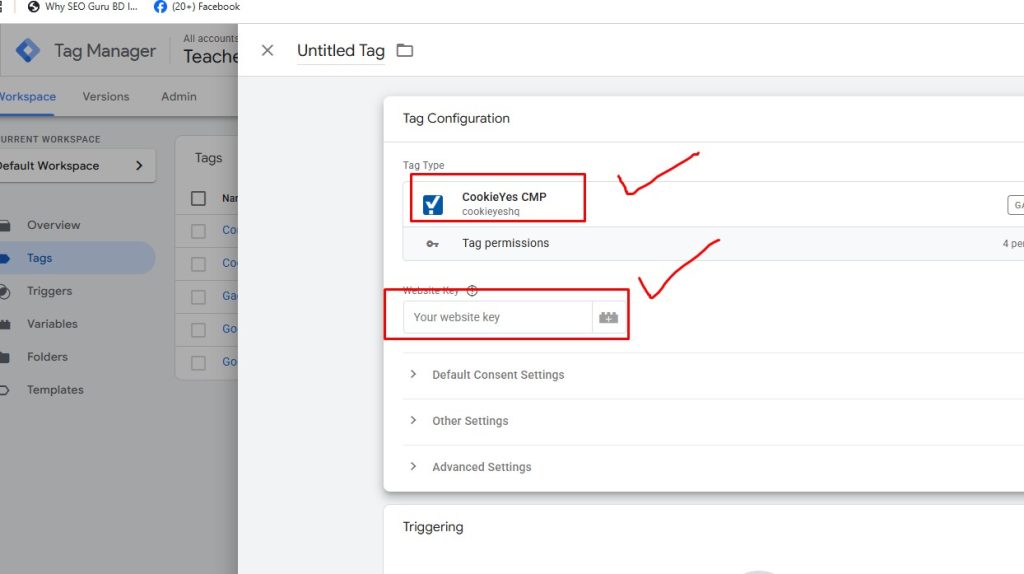
- Paste the CookieYes script
- Trigger: All Pages
Once added, publish changes and clear your cache.
Step 7: Verify the Implementation
Test your website:
- Use Incognito Mode to preview the banner
- Click buttons to test consent preference changes
- Use browser DevTools > Application > Cookies to ensure blocking is working
- Confirm third-party scripts like Google Analytics are firing only after consent
CookieYes also provides real-time consent logs in your dashboard.
Best Practices for Cookie Compliance
To stay compliant and ensure a positive user experience, follow these tips:
1. Keep Your Cookie List Updated
As your website evolves, new scripts may be added. Perform regular scans (monthly or quarterly).
2. Offer Clear Opt-in and Opt-out Options
Let users easily manage their preferences. Use a “Manage Cookies” link in the footer.
3. Update Your Privacy & Cookie Policy
Make sure your policies reflect:
- Types of cookies used
- Purpose and duration
- How users can control them
4. Enable Geo-targeting
Avoid displaying cookie banners unnecessarily to users outside GDPR/CCPA regions.
5. Log and Store Consent
Always keep proof of user consent in case of a data audit or complaint.
Common Issues and Troubleshooting
Banner Not Displaying?
- Check if the script is placed before the closing
</head>tag. - Confirm domain name is correct in the CookieYes dashboard.
Cookies Not Being Blocked?
- Auto-blocking must be enabled
- Third-party scripts must be listed under the right cookie category
Consent Log Not Updating?
- Verify that logging is turned on under settings
- Reconnect the website if needed
For persistent issues, consult CookieYes Help Center or reach out to support.
Final Thoughts
Implementing a cookie consent solution like CookieYes isn’t just about ticking a legal checkbox — it’s about respecting your users’ privacy and building credibility.
With this step-by-step guide, you now know how to:
- Set up and configure CookieYes
- Install it on various platforms
- Keep your site compliant with GDPR, CCPA, and other data laws
By using CookieYes, you ensure peace of mind, legal protection, and a transparent experience for your site visitors.
Some FAQs of Cookie Yes
Is CookieYes Free?
Yes, CookieYes offers a free plan with basic features and 1 website. Premium plans unlock more advanced options.
Does CookieYes support GDPR and CCPA both?
Yes, CookieYes is compliant with GDPR, CCPA, LGPD, and other global privacy regulations.
How often should I scan my website for cookies?
It’s recommended to scan your site at least once every month, or whenever new tools/scripts are added.
Can I use CookieYes with Google Tag Manager (GTM)?
Absolutely. You can paste the CookieYes script into a Custom HTML tag in GTM and control when other tags fire based on consent.
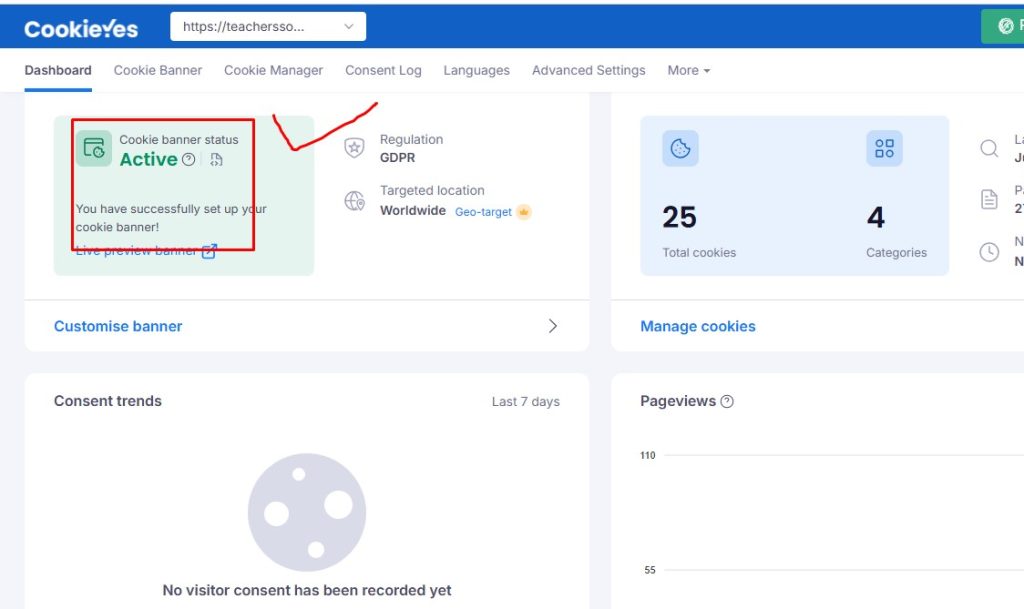
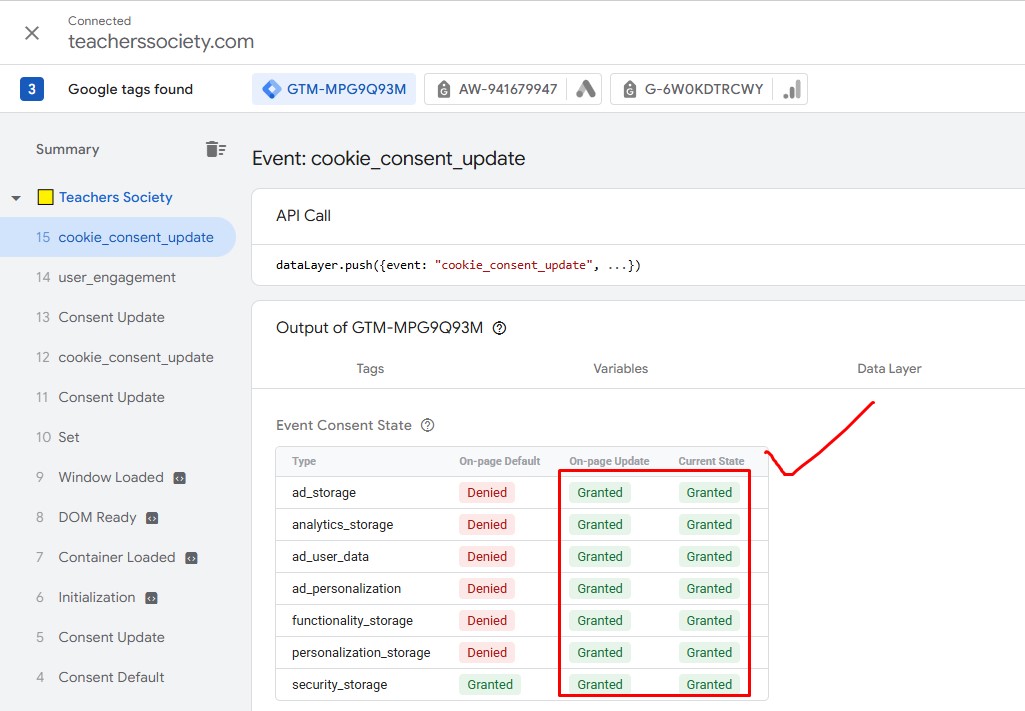
If you want to set up Cookie Yes consent mode V2, don’t hesitate to contact me. I will set up this as per the Google requirements, and you will find your Cookieyes dashboard like this:
Read more: Cookiebot Setup Guide: How to Implement Cookie Consent on Your Website